In this article I would like to show you how to safely update WordPress and keep your website up to date independently.
In order to be able to update your WordPress installation without complications, it is important to make sure to use as few plugins as possible already during the website creation. I have seen WordPress websites that had between 30-50 plugins installed. In the vast majority of cases, this is way too much and absolutely unnecessary. This is often the case when the admin in charge didn’t know how to solve simple changes via CSS or even via a child theme. So in these cases, a separate plugin is often installed for every little thing.
The real problem with too many plugins is the significantly higher risk of encountering compatibility problems during updates. The more plugins have to get along with each other, the more difficult it can become. Therefore, I can only advise you to install only plugins that are really necessary.
If you haven’t updated your WordPress website for more than 2 years, you might have problems here as well. This is a story that you can only judge case by case. It becomes problematic especially if plugins have disappeared from the official plugin directory on WordPress.org in the meantime. In such a case, you will probably not get around to exchange old plugins for new ones to safely update to the latest WordPress version.
Make WordPress updates only if a current backup exists
Make sure you always have an up-to-date backup of your WordPress website. You can also manually trigger a backup before major updates. You can see from the Google Drive icon that your backup has been successfully saved to Google Drive.
The motto “better safe, than sorry” applies here! From my point of view UpdraftPlus the best free plugin for creating backups. This plugin not only automatically creates backups of your WordPress website at regular intervals (set by you), you can also trigger a manual backup at any time.
When configuring the plugin, make sure to save your backup remotely as well. For example, you can choose Google Drive or your Dropbox account. Because if in the absolute worst case scenario the whole web server is affected, a backup on this very server won’t help you much. Then you’ll be glad that your backups are also in the cloud.
So before you update your WordPress version / plugins or theme, make sure you have an up-to-date backup ready. You must always expect that if you have problems after an update, you will have to restore your website through the backup. But before you resort to restoring, first check what the problem may be. Maybe it can be solved in the short term by disabling a plugin. Then you can wait for another update (this can happen especially after a major update).
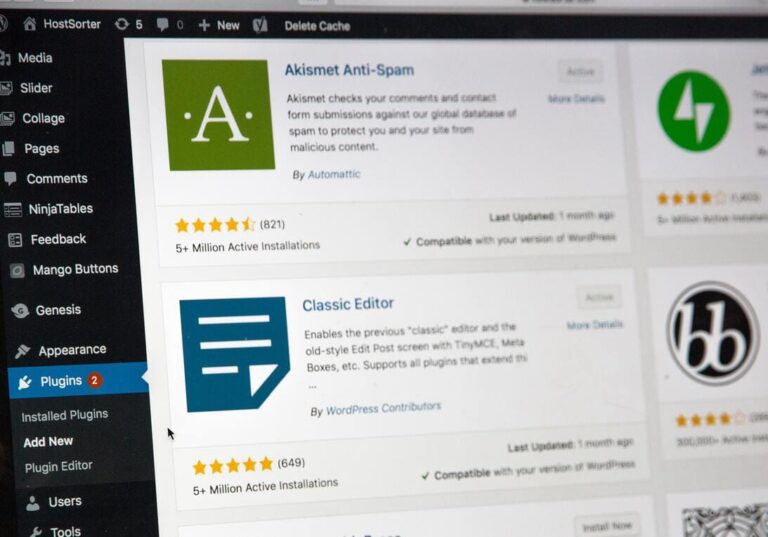
Only if plugins are already compatible, you can safely update WordPress (Major Updates)
WordPress Plugins: Pay attention to the author’s compatibility confirmation!
When you are on the WordPress updates page, you can see if the plugins are already compatible with the current WordPress version. It is advisable not to update right after a major update (that’s double digit updates like currently 5.3). Wait until plugin developers have had a chance to test their plugins for compatibility with the latest WordPress version. If a plugin update is compatible, you can see that by the last line. There it says the following: Compatibility with WordPress 5.3: 100% (according to the author). If you see this note, you can first assume that you can make your update without any problems.
Important: If most plugins are compatible according to the authors, do the WordPress update first and then the plugin updates.
Minor updates WordPress makes now automatically, these are the 3-digit numbers (for example 5.3.1). With these updates usually nothing can happen.
Use only WordPress plugins that are updated regularly
Wordfence Security helps you detect outdated plugins. If you see this message in your scan, find a replacement for the affected plugin as soon as possible and remove the old one.
The biggest security gaps are caused by outdated plugins, some of which have even been removed from the WordPress directory. These must be eliminated completely. Always make sure that you only use plugins that have been installed frequently (always a good sign, many users also means a lot of user feedback / fast bug fixes) and are also updated regularly (depending on the plugin also does not have to be every 2 weeks). Only if the plugin is actively maintained by a developer, you can be sure that this will work smoothly with future WordPress installations. This way you ensure a future-proof website.
Plugin recommendation: Wordfence Security – Firewall & Malware Scan
Our own website and all our customer projects use the free plugin Wordfence Security. The plugin is the most popular security solution for WordPress and provides high security with a firewall and a malware scanner. Convenient: Even outdated plugins are chalked by the plugin. So if you pay attention to Wordfence’s emails, you shouldn’t run into any problems (though there’s no reason to panic directly at every email). If an installed plugin has closed a known security hole, you will also get an email and can react to it immediately.
Run WordPress updates in a test environment first
For this you need experience in using your web hosting package
If you really want to be sure that your website will still work seamlessly after updates (which is mostly the case), the next logical step is to create a test environment. This is where the free plugin “Duplicator – WordPress Migration Plugin”. The plugin allows you to clone your WordPress website.
How to create a test environment in 8 steps (basic knowledge required):
1. Create a subdomain (via your web hosting package)
Create a subdomain (e.g. test.yourdomain.com) that leads to a newly created and empty directory on your server. You can usually create subdomains without any problems if you log in to your web host with your access data. Look for the item “Domains or Subdomains” and create the new domain. The cloned WordPress website will be installed and later accessed via this domain. Using a subdomain is our way-to-go, because relative paths (links that do not use the full URL, e.g. “/blog/your-blog-article”) will then continue to work without problems. If you would put your WordPress clone in a subdirectory, the link would become: “/wordpress-folder/blog/your-blog-article”. Already we have a 404 Error in our test environment.
2. Create a new SQL database (via your web hosting package)
Now we also need a separate SQL database for the WordPress clone. Here it is important that your web host allows more than one database at all. If not, we unfortunately can’t create a copy, because the database is already occupied by your WordPress website. While it is possible to install multiple WordPress installations into one database, I definitely advise against it here! You should really only do this if you know what to look out for. If you can create a new database, do so and note / save the credentials, if you can assign a note when creating, name the new database uniquely (eg: WordPress test environment).
Connect to your web server (FTP client)
Connect to the web server via your FTP or sFTP access. You can also find the access data via your web host access. There must be an item with accesses / FTP for this. You can connect to your webserver for example with the free program FileZilla (Windows) or Transmit (Mac) establish a connection. Connect to your server and call the newly created directory (if the folder was not created automatically when you created the subdomain, create a new folder in the root directory for your test environment (e.g. testumgebung). Usually the root directory is (/htdocs/, /httpdocs/, /public_html/, /www/ or simply the domain name). It depends on the web host. Make sure your directory created for the WordPress clone is empty. Also make sure that your created subdomain (test.yourdomain.com) points to the new directory (for example to the following directory: “/www/testenvironment”).
4. Create a new migration package with the Duplicator plugin (WordPress backend)
Install the plugin and then go to “Duplicator” in the menu. Select “Create new” here. In the following steps you can already enter a few details. In the best case you already enter the access data for the new database and also the new domain name (test.yourdomain.com). If you do not do this here, you can also do this during the installation in the new directory.
5. Download files and upload them to your web server (FTP client)
Finally, you will get two files that you now need to download. Once the installer (installer.php) and a ZIP archive with all the relevant data for your WordPress website (images, plugins, database, etc.). Once you have downloaded them, use your FTP program to upload the two files to the newly created directory.
Again, there must be no files in the folder other than the installer and the archive.
Once the upload is complete (can take a while depending on the file size), you can call the installer. If everything went correctly, call it via the following URL: test.yourdomain.com/installer.php (see next screenshot).
6. Follow the instructions of the installer (browser)
WordPress Duplicator Setup
If everything went according to plan, follow the instructions of the installer! If you don’t have any database credentials yet, have them ready for the installation. At the end of the installation it is important that the new subdomain is specified as WordPress address (test.yourdomain.com).
7. Complete the installation and log in to WordPress (browser)
Normally nothing should go wrong now, when the installation is complete you will be redirected to the WordPress login of the clone. Log in with your known credentials to make sure that all files used by the installer are removed from the directory.
8. Check test environment and shield it from outside (WordPress clone backend)
The last step is to make sure that only you have access to the test environment. The best way to do this is to put your new directory behind a .htaccess lock. To do this, search for “directory protection” or “password protection” at your web host. There, select the directory of your clone and set a username and password. If you can’t find that, make sure that the following item is active in the WordPress settings under the “Read” item: prevent search engines from indexing this website. Additionally, install a plugin that prevents access from the outside. This can be done for example with this Coming Soon Plugin.
Can it be less complicated?
I realize that creating a test environment can be a bit overwhelming for inexperienced WordPress/web hosting users. However, if you maintain your WordPress website yourself, a test environment can make you feel much better. If it fails when creating, there are still many tutorials to the Duplicator that show the process step by step. If you lack the time, you can certainly ask the creator of your WordPress website to do the cloning process.
Update WordPress securely – My conclusion
In conclusion, a website is not immediately “hacked” just because no updates are made for a few months. Especially if Wordfence is active, nothing should happen as a rule. Through my circle of acquaintances I had access to a WordPress installation that was a good 7 years old. There is also never happened (despite high access numbers)! But I have also seen some infected installations. Triggered by old plugins that made it possible to change various database entries via the plugin. So corrupted files ended up on the server via an inserted upload field (which Wordfence would have seen). But if you care a little about the maintenance and security of your WordPress website, you should be on the safe side.
This article should also answer the question why website care and maintenance costs money. The problem is that the respective monthly amount always has to cover the risk as well. It is almost like an insurer. First of all, one assumes that regular and careful updates and special caution will not lead to complications. But if an update causes unforeseen problems, the solution can take several hours in the absolute worst case. So the principle is similar, you pay so you don’t have to worry about the functionality and security of your website yourself. For any company, especially SMEs, that actively use and need their website as a marketing channel, the care and maintenance by an external service provider can be a great relief and excellent investment.
Frequently asked questions
Does WordPress do automatic updates?
If you don’t use an update manager to automate updates (which we don’t recommend), WordPress will only do minor updates. Plugins or themes are not affected. Major WordPress updates have to be done manually. The minor core updates can also be disabled in wp-config.php. However, we also advise against this!
How often should I make WordPress updates?
If you are actively working with your website and are often logged into the backend anyway, just do the existing updates directly. Depending on the number of active plugins 2-3 times a month are optimal. But you should make WordPress updates at least 1 time a month to be always on the safe side.
Does WordPress do automatic backups?
WordPress does not make backups itself. But you can create automatic backups with the free plugin UpdraftPlus. Just choose an interval (for example, once a week) and the plugin will do the rest for you. It is also recommended to connect Google Drive or Dropbox as remote storage.
In what order should I make WordPress updates?
With WordPress updates, problems can occur from time to time. To minimize the risk, you can follow the update sequence below:
- Perform backup
- Update WordPress
- Update plugins
- Update themes
- Check website
What do I do if an error occurs during the WordPress update?
The first and most important point is to remain calm, even if it is difficult in this situation. When it comes to an error, it is first important what exactly happened. Is there an error message from WordPress? Then google for this exact message. The sources of errors can be many and varied. Errors can come from WordPress, plugins, themes or the server itself. If you still have access to your WordPress backend and your site stops working properly, don’t try to import a backup right away. Before you take this step, first see if it’s not due to a single plugin. To do this, you can disable plugins you suspect as the source of the error and check the site. If this doesn’t solve it and you have UpdraftPlus installed, now is the time to restore the last backup. However, if you no longer have access to your backend, you can also import a backup from your web host (if available).